How to Dance
Parapara looks like a lot of fun, right? But as a new dancer, where do you begin? Starting out, it can all seem pretty overwhelming between the high BPM music, the unfamiliar new moves, or the sheer number of routines out there in the wild. Not to worry! The most important thing is to remember to take things one step at a time and above all else, have fun with it. No one is expecting you to master parapara overnight, but with some basics under your belt and a few pointers in mind, you’ll be learning new dances before you know it!
Structure
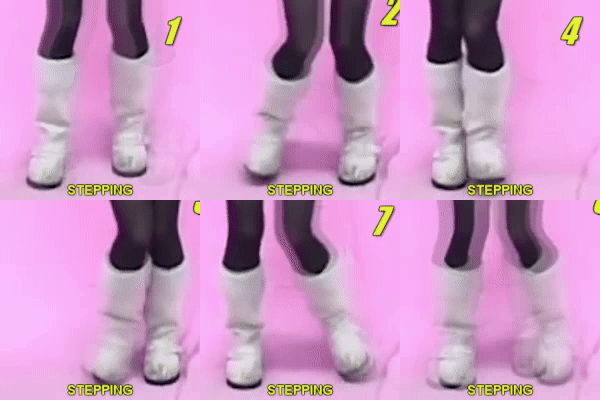
As you watch more and more parapara dances, you will begin to notice that dances generally follow a repeating pattern and are comprised of common, recurring moves such as sweeps, knocks, chops, and so on. Songs and moves are laid out in 4/4 time, meaning that moves can be counted out in time to the beat, (ie: 1-2-3-4-5-6-7-8, 1-2-3-4…). Footwork in parapara is usually rather simplistic and consists primarily of stepping side-to-side in time to the music, (ie: step right [1], step together [2], step left [3], step together [4], step right [5], etc…). For more detailed information, check out the ABOUT PARAPARA section of our site. Before you dive into your first dance, start by learning to keep time to the music, keeping in mind the repeating pattern for parapara dances, and try to master some of the more common moves in time to the beat.
Recurring Moves
These are not the only recurring moves found in parapara, but they are some of the most fundamental and will be a great help in beginning to learn your first dance(s).
Sweeps
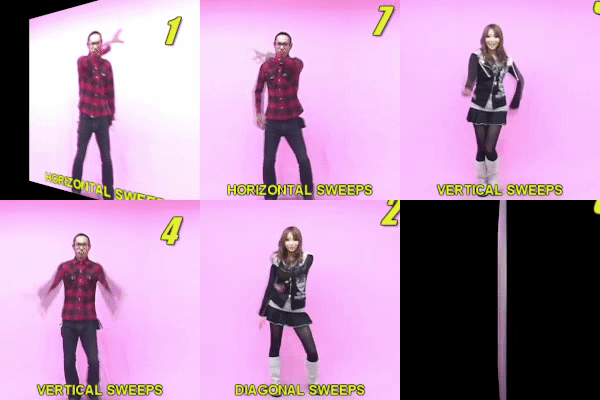
Sweeps are one of the building blocks of parapara. They consist of moving your arms in a sweeping motion from one point to another, typically in the span of anywhere from 2-4 beats. The most common are Horizontal Sweeps (from left-to-right or right-to-left), Vertical Sweeps (downward from high-to-low or upward from low-to-high), or Diagonal Sweeps (downward across the body from upper-left-to-lower-right or upper-right-to-lower-left, or upward across the body from lower-left-to-upper-right or lower-right-to-upper-left). Sweeps can be performed with either one arm or both depending on the choreography for the dance you are performing.
Knocks
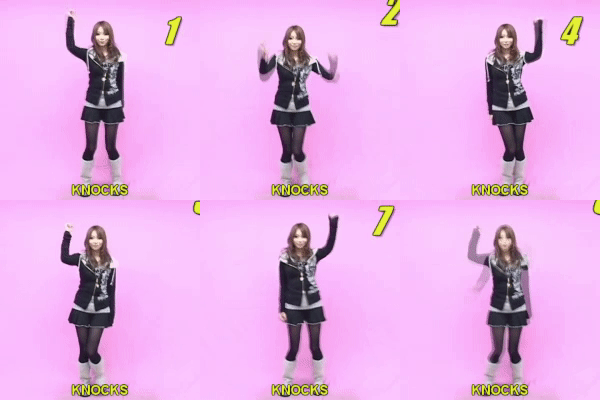
Have you ever pounded on a closed door? If so, then you have this move mastered already! Knocks are performed by forming a closed fist with your thumb facing inward toward your body and “knocking” in the air against an imaginary door or wall. When you perform a “knock” move, your arm should form a right-angle with your upper-arm extending horizontally out from your shoulder, and your forearm pointing upward from your elbow. Knocks are usually performed in pairs, (ie: on beats 1 & 2) and are commonly mirrored on each side of the body, (ie: right-hand knocks on beats 1 & 2, followed by left-hand knocks on beats 3 & 4). Of course, there are occasionally exceptions to this rule.
Chops
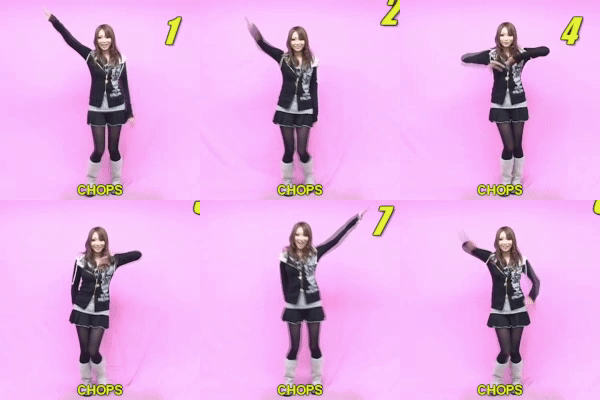
This move spans 2 beats. Part one involves extending your arm upward at a 45° angle out to the side of your body on the first beat. This will be followed by part two, which involves bending your forearm inward toward your chest with your fingertips resting at your collarbone on beat 2. Together these will form a sort of saluting motion which forms the chop. Chops are often performed in pairs, (ie: on beats 1-2 & 3-4) and are commonly mirrored on each side of the body, (ie: right-hand chop on beats 1-2 & 3-4, followed by left-hand chops on beats 5-6 & 7-8). Of course, there are occasionally exceptions to this rule.
Flick+Clap
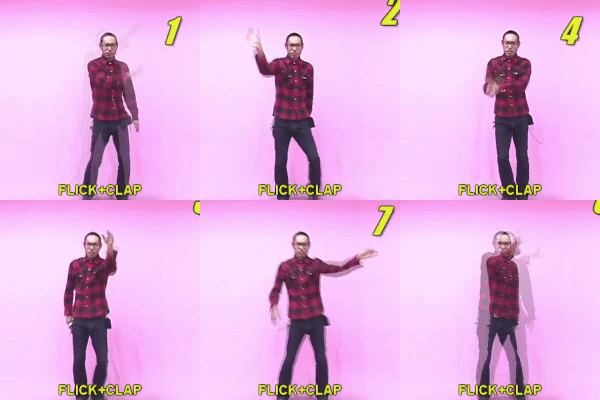
The flick+clap move (or more accurately flick+flick+flick+clap) spans 4 beats. On the first beat, bring your arm across your body, placing your hand at just above your shoulder level, then move your hand in a backhanded flicking motion, rotating your hand at the wrist. On the second beat, perform this same backhanded flicking motion with your arm just above shoulder level and directly in front of you. On the third beat, perform the same backhanded flick with your arm just above shoulder level on the side opposite where you arm was on the first beat. Lastly, on the fourth beat, clap your hands together in the position where you ended the flick on the third beat.
This motion resembles a sweep accentuated by flicks along the first 3 beats, and punctuated with a clap on the 4th beat. “flick+flick+flick+clap!” (or as the Japanese tend to prefer, “nami+nami+nami+pon!”) Flick+clap motions are often performed in pairs with one set moving in one direction, and the second set moving in the opposite direction. Of course, there are occasionally exceptions to this rule.
Learning Tips & Tricks
With the basics out of the way, you can now move on to attempting your first dance. Much of learning parapara will be a regimen of observing, mimicking, repeating, and refining.
Observation
First, start with the observation step. Find a parapara routine you enjoy. Many dances are available online through popular services such as YouTube or can be downloaded from places such as the MEDIA section of this website. If this is one of your first dances, try to find a routine that contains a good number of recurring moves and that does not throw in too many unique elements like non-standard footwork. Watch the dances a few times until you are loosely familiar with the song and the look of the dance. Many beginning paralists (people who dance parapara) start by learning routines that were featured in the ParaPara Paradise 2nd Mix arcade game. A quick internet search can turn up a track list to research and select from.
Mimicking
Next, you will move on to the mimicking stage. Here’s where the real learning will begin. For this step, there are a range of viable approaches. You could always learn from a friend, having them demonstrate the moves. You could attend a parapara workshop such as one of EKS-D’s “Intro to ParaPara” workshops at conventions such as A-kon, AnimeFest, or Momo-con (Hooray for shameless self-promotion! ;D). You could opt to attend a club event in Japan. Or, you could learn by watching and mimicking videos of other paralists, which is the most common and accessible method for learning new dances. For the purpose of this primer, we will go over EKS-D’s preferred method for self-study which involves using VLC Media Player and readily available parapara videos. This guide is based on the Windows version of VLC but should carry over to all Desktop versions of VLC (such as Linux and Mac OS X). Some options such as VLC’s Video Effects features are unfortunately unavailable on mobile (iOS/Android).
If you do not already use it, begin by installing a copy of VLC Media Player from www.videolan.org/vlc. At the time of writing, VLC can be run on Windows, Linux, Mac OS X, Unix, iOS, and Android and is free to use. You will be using VLC to play the videos of the dance(s) you wish to learn.
-
Identify Your Source
If you are unable to use a downloaded video, for instance if you are only able to stream your videos from YouTube, then you may be able to take advantage of VLC’s Network Streaming feature. Compatibility for this option is not 100%, so downloading videos is still preferred whenever possible.
Videos of parapara dancing largely fall into two categories, those that are reversed (flipped horizontally to create a mirror image) and those that are standard (presented as you would see the dancers if they were in person).
Many
paralists find it easiest to learn from reversed videos, however many of the videos available online or on retail videos are presented in the standard format. So that you learn the moves properly, you will first want to identify if your video is standard or reversed. 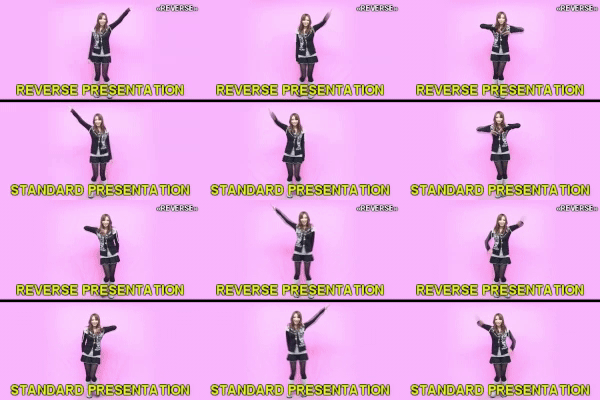
Since moves in parapara, with rare exception, begin on the right-hand side, if the dancer(s) in your video start by stepping to or making movements on the right-hand side of your screen, you are likely watching a reversed video. This is often reinforced by a visual indicator such as the word «REVERSE», «MIRROR», or similar appearing somewhere on the screen, typically in a corner of the video.
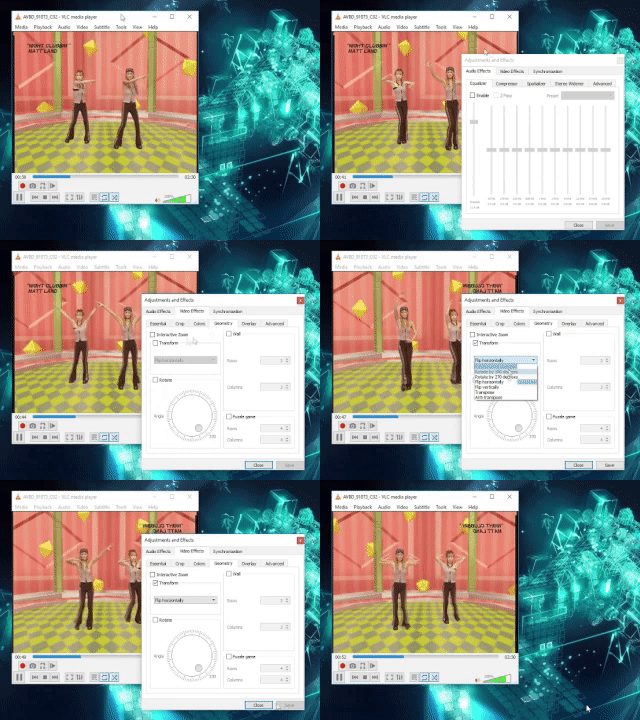
If you do not see a «REVERSE» indicator, or if movement or stepping begins on the left-hand side of your screen, you are likely looking at a standard video and this is where some of VLC’s advanced features will come in handy.
-
Play Your Video
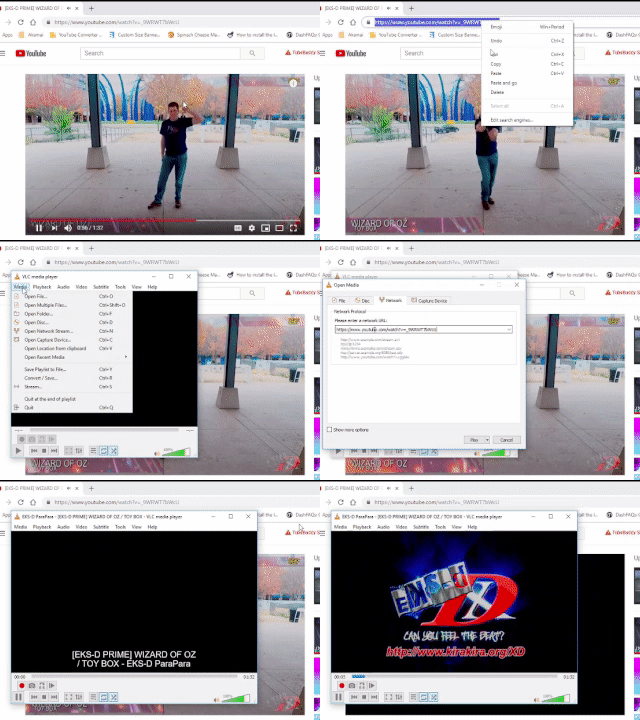
If you will be using a streaming video, start by finding the video you wish to learn from on YouTube or a similar streaming website (note: YouTube seems to be the most reliable for this method) and copy the web address for the video. Next, open VLC and navigate through the menu options to open your video. This can be found in the following menu Media > Open Network Stream. Paste the web address for your video into the text box titled Please enter a network URL:. Lastly, click Play and with some luck, your video will begin playing in VLC.
If you are instead able to use a downloaded video, this is the preferred method and works far more reliably. Simply open the video in VLC and move on to the following steps.
-
Watching on YouTube with Playback Modifications
The MirrorTube plugin for Chrome is incredibly useful for mirroring video playback, adjusting playback speed, or looping sections of a video for practice. Start by installing the MirrorTube plugin from the Chrome Web Store. If you use a browser other than Chrome, similar browser plugins may be available from another developer. If you prefer not to install a plugin, mirror-tube.com allows you to mirror video playback, but does not offer video looping options; video playback rate can be adjusted via YouTube’s native settings.
Once the plugin has been installed, you will be able to use it to manipulate the playback of YouTube videos and some other streaming videos. Simply navigate to the video of your choice and access the MirrorTube plugin settings from the toolbar. Settings are fairly straight forward with a checkbox to toggle video mirroring, a slider to control the video playback rate, and a Repeat section for setting to set playback loops.
To set a playback loop, jump to the point in the video you wish to start the loop and click the lefthand timestamp in the MirrorTube settings. Next, set the end of your playback loop by repeating the same steps, instead clicking the righthand timestamp to set the end of the loop. Once start and end timestamps have been set, checking or unchecking the Enable checkbox in the Repeat section of the MirrorTube settings will toggle looped playback between the start and end timestamps.
-
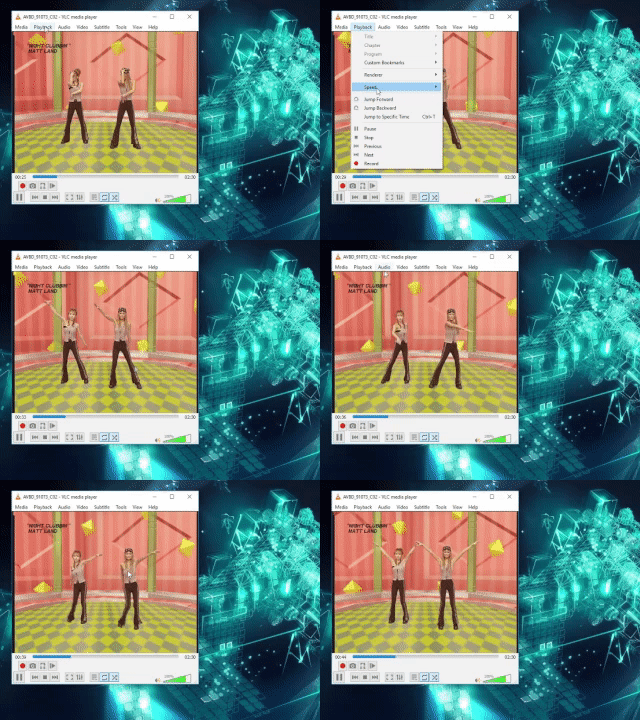
Using VLC’s Video Effects & Playback Features
Repeat & Refine
Once you are dancing at full speed, continue to practice the dance multiple times to work on perfecting your personal style and dancing form until you achieve the look you desire. If it is an option, practicing in front of a mirror can help you identify areas of opportunity or adjustments you may wish to make in the way you dance. If you are unable to dance in front of a mirror, you can always film yourself and review the footage or ask a friend or fellow paralist for a critique. Remember that mastering parapara won’t be achieved, or expected, right away. Practice regularly and be open to feedback, but keep in mind that not everyone excels at constructive criticism! Most importantly, have FUN and keep dancing.
So now that you have the basics under your belt, get out there and move to the music, embrace the rhythm, and ask…
